Blogs

WordPress vs. Drupal: How to Choose a CMS for Your Business

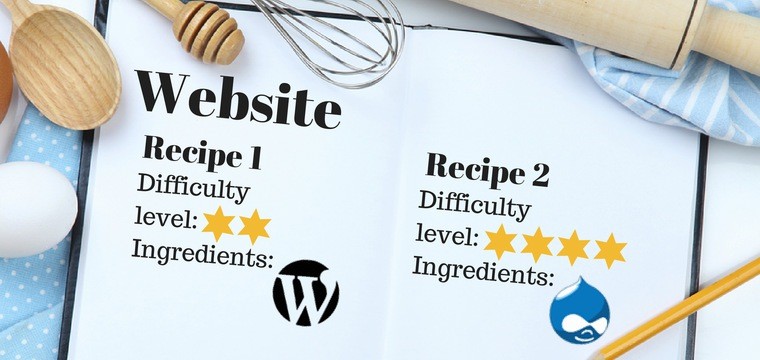
Like any sibling rivalry, WordPress vs Drupal have been competing to be the best content management system (CMS) ever since their ‘births’ in 2001 (Drupal) and 2003 (WordPress). While both considered being very good website creation tools, they have different strengths.
WordPress vs Drupal

While WordPress may be more popular with over 140 million downloads, Drupal is more multi-faceted, as it is recognized for being “one size fits all”. Despite their varying strengths and weakness – in terms of available themes and plugins, update frequency, and skills required – what makes one option better depends on how their differences fit with your business’s needs.

When it comes to sibling rivalry, every person has his or her favorite. So how do you choose your favorite CMS? Consider and prioritize each of your website’s potential needs or requirements, and read on to see which ‘sibling’, WordPress or Drupal, is best for you.

Need: Ease of Use

In WordPress vs Drupal WordPress is extremely easy for nearly anyone to learn to use. Equipped with a basic understanding of HTML and CSS, you can take advantage of its impressive plugin library (hundreds of thousands of plugins), to add a variety of features to your content management system (CMS).

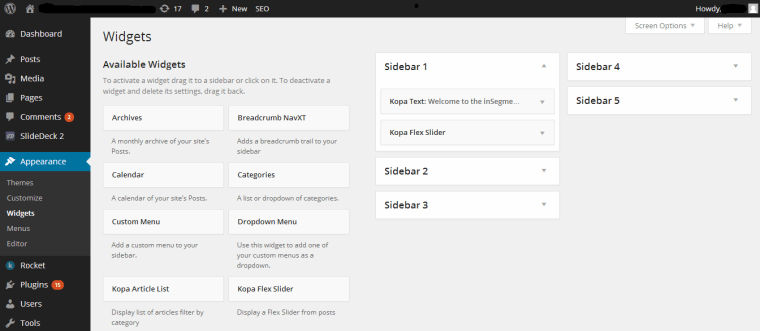
This, combined with the many theme options, allows you to better customize the tool to your website’s needs and build a high-quality website in no time. In addition, as you can see from this screenshot, WordPress’s easy-to-understand user interface clearly lays out and marks each of its functions and customization options.

Wordpress vs Drupal

This makes it faster and easier to learn – especially compared to other software platforms such as Drupal – allowing you to dedicate less time to build the website or less money to having someone else do it. This means more time and money you can spend developing other important aspects of your business.

Need: SEO Strength

Really, you can’t go wrong with either option when it comes to building a site for SEO purposes. WordPress and Drupal were both designed to produce the most search-engine friendly sites. However, with SEO tactics evolving and becoming more content-focused, Drupal may be the better choice in order to get your site to the top of the search engine results page (SERP). See the next point to learn why.

Need: Large Content Capacities

It’s no secret that producing helpful and unique content is extremely beneficial to a brand’s search engine optimization (SEO). Search engines recognize this as being a very reliable indicator of the quality of a site for its users.

It’s simple – the better the content on your website, the more likely it is that your site will appear at the top of the SERP. Businesses that value this SEO strategy should use Drupal because this software is able to “handle hundreds of thousands of pages of content with ease.” Therefore, for websites that also offer a lot of content due to their industry or purpose, such as e-commerce sites (e.g. Amazon.com) or sites that offer an article directory (e.g. eHow.com), Drupal again is the easy choice.

Need: Enterprise Accommodation

In WordPress vs Drupal Due to the reason above, Drupal is also the better option for enterprises. Drupal’s system includes strong version controls and access control list (ACL) capabilities, which make it very secure for big businesses and their immense amounts of content. WordPress, on the other hand, is typically only recommended for small to medium-sized websites because its default backend was built with the intention of being used for blogs.

This means that heavily posting content on a regular basis can cause slowness and general difficulty when using WordPress. Another advantage of Drupal for enterprises is that it maintains the maximum stability of your website through automatically scaling to accommodate various numbers of users.

Need: Multiple Author Participation

For businesses with this need as a priority, WordPress is easily your best bet. From its beginning, a main focus of the WordPress system was to be able to accommodate several authors, making it ideal for serious publication sites and sites that use guest-bloggers. However, there are several features of Drupal which helps to increase website privacy, which brings me to my next point…

Need: Maximum Security

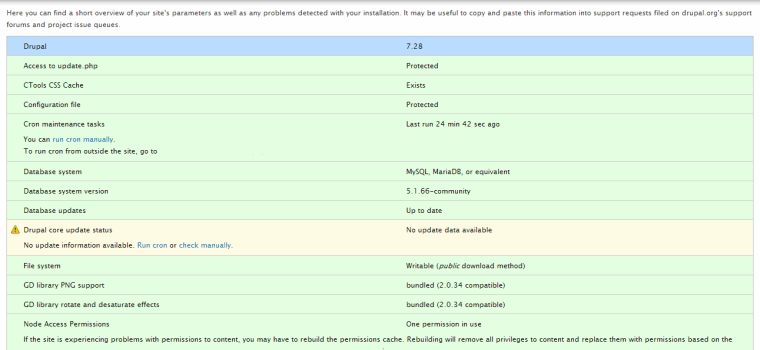
In WordPress vs Drupal Unfortunately for WordPress, security issues come with being the category-leading software with not just thousands, but millions, of installations. This means if you are concerned about hacking threats and are unwilling to install third-party plugins in order to secure your WordPress installation, Drupal is the better option. Drupal takes security very seriously and has covered its users for common security vulnerabilities, as well as provides them with security reports (like the one below) regarding their websites and installations of the software.

WordPress vs Drupal

Therefore, banks and other businesses that house a lot of private financial or personal information should certainly use Drupal. You can find more information on Drupal’s security features.

If you would still prefer to use WordPress, be aware that it lacks compatibility with older plugins. This means any new updates WordPress releases will not work with your current installment, given the use of these add-ons. Not receiving these updates will make the business even more vulnerable to hackers, break any current plugins, which then also means potentially breaking the site entirely. To avoid these risks, make sure to use newer plugins or update them in a timely manner when using WordPress.

Need: Design Capabilities

In WordPress vs Drupal There really is no debate as to which CMS is better when it comes to design. While with WordPress you can certainly create a visually appealing website, the design options are quite limited, especially when compared to Drupal. Drupal has many impressive features that allow the development of superior and unique designs for your website. It is an extremely powerful and capable tool.

Therefore, if you are hoping to build an equally impressive, feature-rich, or data-intensive website, that is both attractive and user-friendly to visitors, then there really is no decision left to make. For those of you with more simplistic taste, style and skill, WordPress are ideal.

WordPress prides itself on its ease when it comes to website customization. Using its thousands of free themes options, you get to avoid any complication and confusion, while still designing a well-functioning and appealing website. These different themes each come with their own plugins and recommendations as to what type of website they are most appropriate.

Need: Flexibility

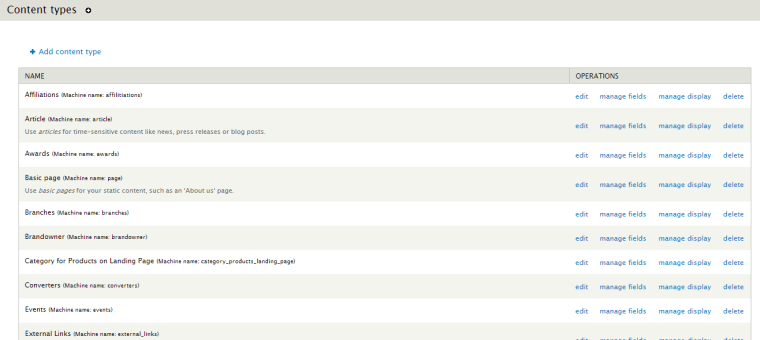
In WordPress vs Drupal Though with WordPress you can create a whole variety of simplistic designs, including having a business portfolio, a blog, and an e-commerce store, its spectrum of ability still does not compare to that of Drupal’s. Drupal may be known for its superiority in developing powerful websites that can handle immense amounts of pages and users, but it can also be used to create the most simple and basic sites, such as ones intended for event listings, product listings, articles, or you can even create your own content type. This screenshot shows only a small number of the many page options Drupal offers:

WordPress vs Drupal

If you are interested in learning Drupal, be sure to take advantage of this flexibility. Start off by using its beginner-level functionalities to build an average blog, and then as you start to learn the ropes, explore its numerous other capabilities to create a truly impressive website.

Need: Skilled Developer Engagement

In WordPress vs Drupal Depending on how you look at it, Drupal’s developer-friendly design is one of its beauties, as well as one of its most intimidating aspects. With this tool, the design possibilities are endless for developers because they are not only able to, but are also encouraged to, come up with their own unique solutions when building a high-functioning and original website. However, this does make Drupal far less lay user-friendly, meaning that businesses who are unfamiliar with the skills needed to use Drupal, are probably better off sticking with WordPress. Unless they are able to afford to outsource to a developer, which brings me to my next consideration…

Need: Affordability

WordPress vs. Drupal: How to ChooseWhile I do recommend paying for the extra security plugins when using WordPress, the cost of using Drupal certainly adds up. In terms of literal cost, Drupal does not offer any free plugins, or as they refer to them, “modules”. In order to use the high-quality modules (which is really the whole point of using Drupal), you must pay out-of-pocket.

Additionally, a basic Drupal installation does not include any themes, which means that if you want to get the most out of the tool, hiring a developer is practically required. Also, if you do choose to avoid the upfront cost of hiring a developer, you will still have to pay a time cost due to Drupal’s extreme learning curve.

It is a very complicated software system, which requires a lot of research and experimentation to finally get it right. However, many would still argue that the results are well worth the effort.
Backup WordPress Plugin Review

Backup WordPress is a free plugin for WordPress which creates an automatic backup of your files and databases. You can also use it to automatically create a Backup WordPress of your database every day rather than creating a backup of your files as well. If you DON’T create a Backup WordPress and store it away from your web server, you risk losing everything like these 4,800 websites lost with NO chance of recovery.

Backup WordPress

BackupWordPress is one of the best free WordPress plugins for creating a Backup WordPress of both your files and databases automatically BUT how do you restore them?

You would need to understand how to restore both your files and databases which can take some time to learn.

BackupWordPress does a great job of creating a Backup WordPress of your WordPress site but it won’t help you migrate to a new domain or web hosting server. It also won’t change your URL’s if you want to use it when changing domains.

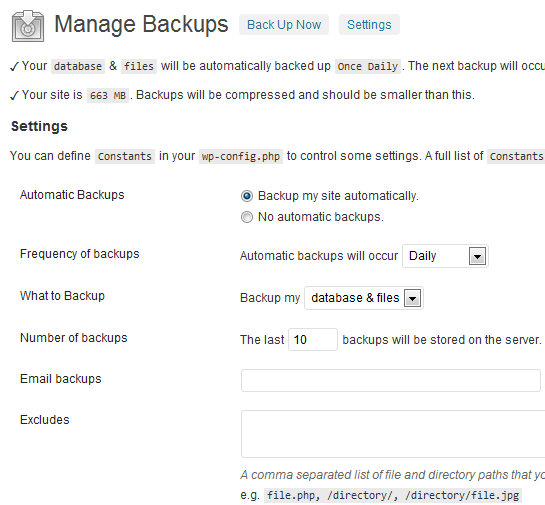
Settings:

The plugin settings couldn’t be easier to configure

Automatic Backups – Choose to automate your backups or disable this setting and complete a Backup WordPress manually when you need to.

The frequency of Backups – Choose frequency of backups – daily, weekly, monthly

What to Backup – Choose to backup files & databases or either files or databases

Number of Backups – Choose how backups to keep on your server

Email Backups – Email your database backup if it is under 10 mg

Excludes – Insert a directory to exclude from backup like a subdirectory or directory of videos you have already backed up.

Backup WordPress

This is an excellent plugin for automatic backup of WordPress files and databases. BackupWordPress simply creates an automatic backup which can be completed manually using cPanel.

The biggest advantage of using the BackupWordPress plugin is that it works automatically and creates a Backup WordPress of both your files & databases.

Manage & Download WordPress:

Here you can download your backup to your local computer and also create a new backup immediately without the need to configure the scheduling settings.

Simply click the Download link under Actions to copy the backup of your files & databases to your computer. If you need to create a backup, click the Backup Now Link at the top of the screen.

Once you have saved your backup locally, you can then delete the backup on your server or leave a copy here just in case.

Backup WordPress

I don’t use this plugin because I use Backupbuddy as it offers a better solution for migration and restoration to an existing server, new server, new web host or new domain which BackupWordPress doesn’t offer.

“If you are hosting your WordPress site with WPEngine, the use of the BackupWordPress plugin and backupbuddy have been banned as they offer their own daily backup service.”

25 Mistakes WordPress Blogger Should Avoid

WordPress Blogger you’ve ever worked in the hospitality industry, you’d know the first 11 seconds are important. In many cases, it’s the same when you land on a website. Here’s a few reasons which may turn you off subscribing to or linking to a WordPress blog.

WordPress Bloggers

1. Ignoring Your Readers:

As a WordPress Blogger I remember reading a saying like this: People forget what you say, forget what you did, but they don’t forget how you make them feel. Ignoring emails from your readers when they need help means you’re either making too much money or just don’t care about people when they reach out to you. People won’t forget that in a hurry.

2. Too Much Content:

As a WordPress Blogger There’s no doubt that long posts which cover all bases can also provide solutions for more readers. Don’t forget most people’s attention span is fairly short. Consider breaking up long posts using a series, pagination or more specific content which is more straight to the point.
3. No Paragraphs:
Have you ever read a post which contains no paragraphs? Did you make it to the very end?

4. Disabling Comments:

I came across a blog recently which was all about blogging. But they had disabled comments. Maybe its a play hard to get strategy so their readers will write about them or be forced to use the contact form. A WordPress Blogger call It’s working!

5. No Google Authorship:

I know guest authors who don’t even own a website or a Google + account meaning they can’t set up Google authorship. Its a sign they’re not really in it for the long term or that they don’t want people to find out more about them.

6. Using a Bogus Name:

Some people seem WordPress Blogger to think they won’t be taken seriously if they have an exotic name. If your content is focused and provides clear answers which are useful, it doesn’t matter where you come from or live.

7. Not Updating Themes, Plugins and Core:

Lost count of how many times i have read forum posts from site owners who are still using old versions of WordPress. Even 2.5 in some cases which is a massive security risk. The reason being, they’ve hacked the core WordPress files so much they can’t remember where all the code is that they changed. Never edit the core files of WordPress Blogger or your parent theme.

8. Content Not Specific:

I know the biggest and best forums for WordPress encourage you to be as clear and specific as possible when asking questions. This way you’ll get your answer in front of the right people that can answer your question as fast as possible. Its the same with your content. Your readers will be more likely to come back if they get the specific answer they need.

9. Site Not Specific:

How can you be an expert in so many fields? If you’ve got a site like Mashable with an army of staff, then that’s understandable…If you’re a one-man blog with no regular guest authors, it must be a huge challenge keeping up with it all. One niche blog is a huge amount of work in my opinion.

10. Slow Loading Sites:

As a WordPress Blogger Waiting around for more than 2 seconds can be a bit frustrating at times, 5 seconds or more and you’ll start losing a significant amount of your new visitors. Recently I’ve been going through my backlink profile and noticed slow loading sites generally are of low quality. Would you link to a site which takes 5 seconds or more to load?

11. Too Much Clutter:

Absorbing the meaning of an article requires focus. Filling up your sidebar and main content area with flashing banners and other distractions only make it harder for your readers to focus on WordPress Blogger work.

12. Too Much Advertising:

How do you feel when you just start to enjoy reading a post and then you hit a giant banner right in the middle of the content area. Annoying your readers generally won’t make you a sale.

13. Non Related Advertising:

One of the most common tips I have read from WordPress Blogger who make good money from their sites is the way they use highly relevant banners and links to specific products. If you write a story about Twitter Tools, you’ll be waiting a long time to get a sale for hosting. Better to link to a short list of the best Twitter tools. Some free and some premium. Also, try adding custom sidebars for each blog category.

14. Too Many Affiliate Links:

There’s a right way to use affiliate links and there’s a wrong way. Linking to a post which contains a real product review is a good idea. Especially if it contains feedback which is both positive and negative. Always linking directly to a products sales page skips part of the sales funnel which helps you pre-sell the product properly. You’ll find the conversion rates are generally higher and the return rate lower if the buyer understands the pro’s and con’s upfront.

15. Tiny Font Size:

Making your content easy to read increases the chances your readers will continue reading. Let’s face it, most people start to lose their eyesight at some stage. Changing the size of the font used in your text area can be done easily with WordPress.

16. Mystery Man – No Gravatar:

Have you ever scrolled through the comments of a blog and found most don’t contain an image of the comment author. The blog tends to lose a bit of credibility when this is the case, especially when the WordPress Blogger doesn’t use a Gravatar as well.

17. Default Theme:

The WordPress default themes like 2011 and 2012 are well coded and free which results in thousands of downloads. If you plan on joining them, at least add a slider in your header with high-quality unique images and/or change the font style or do something unique!

18. No Backup or Security:

God help you if you get hacked or forget to pay your hosting while on holidays. There’s many ways to backup your site one of which is installing a good free backup plugin for WordPress.

19. No Contact Page:

If you’re not interested in hearing from your readers or listening to what they have to say, blogging is not really for you. Get a static website.

20. No About Page:

What are you hiding? Maybe you have a good reason for not wanting to be found which is legitimate. If not, you may look like you have a dubious past and don’t want anyone to find out more about you. If you’re offering services, your prospective clients will want to know who’s behind the site before they hand over any money and hire you.

21. Always Referring To Yourself:

Famous people are guilty of this all the time. Using the ‘I’ word all the time may come across as being focused on yourself and not the needs, challenges, frustrations and goals of your readers.

22. Slow Loading, Annoying Pop-Ups:

Are you desperate? Or just plain focused on numbers? Who likes it when you arrive at a site and the screen slowly goes dark before the pop up arrives? I know that pop-ups can increase your subscription rate but you may also lose some loyal readers.

23. Not Giving Attribution:

This ones a bit hard to prove sometimes but once you get to know your niche, you’ll just know. Ever had that feeling, i’m sure i’ve seen that picture before or read exactly the same thing on another blog. If you pinch a paragraph, snippet of code or anything from another site on the web, give credit or at least read the terms of use. Sometimes its o.k to redistribute as long as you link to the original source.

24. Not Disclosing The Cons:

Sick of reading one-sided reviews about different products and services? Personally, i’ve found complete transparency results in good conversions so don’t be afraid to list the negatives or approve comments which contain negative feedback.

25. No External Links:

Do your keyword competitors link to you? Do you link to them? Some blogs never link to other blogs in their niche thinking they’ll lose subscribers. If you find great tips on another site, let your readers know about it or share the link using different social media networks.

WordPress Permissions – How To Set Up Proper Filesystems And Ownerships

When people talk about WordPress security, file WordPress Permissions and ownership are usually the last things on their minds. Installing security plugins is a good practice and a must for every WordPress website. However, if your file-system WordPress Permissions aren’t set up correctly, most of your security measures could be easily bypassed by intruders. When people talk about WordPress security, file WordPress Permissions and ownership are usually the last things on their minds.

WordPress Permissions

Installing security plugins is a good practice and a must for every WordPress website. However, if your file-system WordPress Permissions aren’t set up correctly, most of your security measures could be easily bypassed by intruders.

WordPress Permissions

WordPress Permissions and ownership are quite important in WordPress installations. Setting these up properly on your Web server should be the first thing you do after installing WordPress. Having the wrong set of permissions could cause fatal errors that stop your website dead. Wrong permissions can also compromise your website and make it prone to attacks.

Aside from the security concerns, a number of other issues can stem from having the wrong set of WordPress Permissions and ownership. Have you ever encountered a blank white screen when trying to load your website for the first time? Or have you ever received error messages when trying to upload images in the media uploader? Correcting WordPress Permissions and ownership of your files and folders will often fix these types of problems.

In this article, we will teach you all about WordPress files ystem WordPress Permissions and ownership: what they are, why they are important and how to set them up. You will learn a few basic principles that I follow to keep my file system intact. We will also cover the two most common WordPress server configurations. We’ll explain how they differ and, more importantly, how to set the proper WordPress Permissions and ownership for each.

Terminal Vs. FTP Client

During the course of this article, we will be using the terminal to change WordPress Permissions and ownership. Why not use an FTP client instead? The reason is that FTP is a bit limited for our needs. FTP can be used to transfer files and change file and folder permissions, but it cannot be used to change ownership settings.

To perform the commands listed in this article, you will have to be logged into your server using the SSH command. If you are not familiar with the terminal and SSH, you can learn about them in the article “Introduction to Linux Commands.”

Users And Groups

Before anything else, we need to quickly talk about what users and groups are, because these go hand in hand when defining WordPress Permissions.

To put it simply, a user is an account that has access to the computer, and a group just is an identifier for a certain set of users. This means that every time you transfer files using FTP, you are using a user account on your server. And depending on how your host has set up your account, you (the user) might belong to one or more groups. Users and groups are like users and roles in WordPress. Both are conceptually the same, except that the former is used on your server.

Users and groups are important because they help to identify privileges for all of our files and folders. Owners of a file normally would have full privileges on it; other users who belong to the same group would have fewer privileges on it; while everyone else might have no privileges on it. These privileges are what we call permissions.

What Are File Permissions?

Permissions dictate what users can do with a file. A permission is represented by a set of numbers, such as 644 or 777, referred to as a permission mode. If you have used plugins in WordPress before, then you’ve most likely been asked by some of them to change the WordPress Permissions of a file or directory because the plugin can’t write to it. By changing the file’s permissions, you are allowing the Web server to gain access to that file or folder.

Think of a permission mode as a set of “who can do what” statements, in which each digit corresponds to the “who” part of the statement:

  • First digit. What the user of the account that owns the file can do
  • Second digit. What other user accounts in the owner’s group can do
  • Third digit. What the user accounts of everyone else (including website visitors) can do

Next, the number corresponds to the “what” part of the statement and is a sum of a combination of any these digits:

  • 4 Read a file, or read the names of the files in a folder
  • 2 Write or modify a file, or modify the contents of a folder
  • 1 Execute or run a file, or access the files in a folder

These digits are the privileges that are assigned to the “who” in the permission mode. Note in the list above that privileges mean something different for files and folders.

Using the correct permission mode is quite important. To better illustrate this, think again of users and roles in WordPress. On a WordPress website, contributors and administrators have different sets of capabilities. Contributors may create new blog posts, but they may not add plugins. Administrators, on the other hand, may add plugins and also create blog posts. Administrators may even change the look of the website if they want to. A clear line separates what users in different roles can do. This is the same with permission modes, except that instead of dealing with blog posts and theme options, we are dealing with files and folders on the server.

Changing Permission Modes

FTP clients usually provide an interface where you can conveniently change the permission mode of your files and folders. Here’s a screenshot of the interface in my FTP client:

Example of a permission mode interface.

If you have access to your server’s terminal, you can also use the chmod command to change the permission mode of a file or folder:


sudo chmod 644 <file>

To change the permission modes of all files or folders, use chmod in tandem with the find command. For example, you can use this to change all files to 644:


sudo find . -type f -exec chmod 644 {} +

Or use this to change all of your folders to 755:


sudo find . -type d -exec chmod 755 {} +

Refer to “Changing File WordPress Permissions in the WordPress Codex” for a guide to changing permission modes.

The Difference Between 644 And 777

Let’s look at some permission modes and how they affect our website.

What would a PHP script with a permission mode of 644 mean? Following the explanation above of how permission modes work, we can decipher what this mode allows users to do with our script:

  • The owner’s privileges are “read” (4) + “write” (2) = 6
  • The owner’s group privileges are “read” (4) = 4
  • Everyone else’s privileges are “read” (4) = 4

In plain language, this means that:

  • if we own the script, we may read and modify it;
  • everyone else may only read it.

As we can see, 644 is a good permission mode for our PHP script. We can make changes to it, and our Web server can read it.

Now let’s look at folders. What if we owned a folder that had a permission mode of 777? This permission mode can be broken down as follows:

  • The owner’s privileges are “read” (4) + “write” (2) + “execute” (1) = 7
  • The owner’s group privileges are “read” (4) + “write” (2) + “execute” (1) = 7
  • Everyone else’s privileges are “read” (4) + “write” (2) + “execute” (1) = 7

This means that

  • anyone may get a list of file names in our folder;
  • anyone may create, modify and delete any file in our folder;
  • anyone may access the files in our folder.

It is obvious that 777 is a bad permission mode for anything on our WordPress website because any visitor would be able to add files to our directory or even delete scripts. Worse, anyone would be able to put in malicious code and compromise our website.

WordPress Server Configurations

Now we know about permissions and how to read them. But before proceeding to change all of our WordPress Permissions, we need to understand how our server is set up. Because permissions deal with user accounts and groups, we need to know how our WordPress website runs.

A lot of different server configurations are out there. Different configurations need different sets of permission modes for WordPress to work correctly and securely. We’ll talk about just the two most common configurations and the proper WordPress Permissions for them:

  • Standard server configuration:
    • You have a user account.
    • Your Web server runs as another user account.
  • Shared server configuration or suEXEC configuration:
    • You have a user account.
    • Other people who use the server have user accounts and might share the same group with your user account.
    • Your Web server runs as the owner of your WordPress files.

The main difference between these two is in how the Web server runs.

Permissions For A Standard WordPress Server Configuration

Standard WordPress configurations require a bit more work than shared server configurations because the Web server has no relationship to our user account.

FILE AND FOLDER OWNERSHIP FOR WORDPRESS

First, we need to adjust the file and folder ownerships of our WordPress files. We’ll have to make sure of the following:

  • that your user account is the owner of all WordPress files and folders,
  • that your user account and the Web server’s user account belong to the same group.

To find out the groups that your user account belongs to, you can use this command in your server’s terminal:


groups

Then, to find out the groups that your Web server belongs to, you can temporarily insert this PHP snippet in one of your WordPress scripts:


echo exec( 'groups' );

If your user and the Web server don’t belong to the same group, you can use the following command in the terminal to add your user to one of your Web server’s groups:


sudo usermod -a -G <a-common-group-name> myuser

Lastly, to ensure that everything in our WordPress folder belongs to our user account and has the shared group that we just added, perform this command in your WordPress folder:


sudo find . -exec chown myuser:a-common-group-name {} +

PERMISSIONS FOR WORDPRESS

All of our files and folders should now have the correct ownership. Now it’s time to adjust the permission modes. To make things simpler, you’ll only need to remember the following:

  • All files should be 664.
  • All folders should be 775.
  • wp-config.php should be 660.

Here’s what we’re trying to achieve with this set of permission modes:

  • Our user account may read and modify our files.
  • WordPress (via our Web server) may read and modify our scripts.
  • WordPress may create, modify or delete files and folders.
  • Other people may not see our database credentials in wp-config.php.

You might be thinking that allowing WordPress full privileges with our folders is not secure. Don’t worry — we’re doing this because WordPress needs certain features to create and modify files. WordPress allows us to upload and remove themes and plugins and even edit scripts and styles from the administrative back end. Without this type of permission, we would have to manually upload themes and plugins every time using FTP.

You can use your FTP client to change the permission modes, or you can use the following commands in your WordPress directory to quickly adjust the permissions of all of your files and folders:


sudo find . -type f -exec chmod 664 {} +
sudo find . -type d -exec chmod 775 {} +
sudo chmod 660 wp-config.php

Note that some Web servers are stricter than others. If yours is strict, then setting your wp-config.php to 660 might stop your website from working. In this case, just leave it as 664.

Permissions For A Shared Server Configuration Or SuEXEC Configuration

Permissions for shared server configurations are easier to implement. We won’t dwell on ownership because the Web server runs as the owner of our files and folders. Because our user account and the Web server share the same permissions (both are owners), we can dive right into modifying the permission modes:

  • All files should be 644.
  • All folders should be 755.
  • wp-config.php should be 600.

Similar to the previous set of permission modes, these break down as follows:

  • Our user account may read and modify our files.
  • WordPress (via our Web server and as the account owner) may read and modify our scripts.
  • WordPress may create, modify or delete files or folders.
  • Other people may not see our database credentials in wp-config.php.

Again, you can use an FTP client to change the permission modes, or you can use the following commands in your WordPress directory to quickly adjust the permissions of all of your files and folders:


sudo find . -type f -exec chmod 644 {} +
sudo find . -type d -exec chmod 755 {} +
sudo chmod 600 wp-config.php

Similar to the standard WordPress server configuration, your server might be stricter than others and might not allow wp-config.php to be 600. In this case, you can adjust it to a more lenient 640; if that still doesn’t work, then use 644.

Always follow these guidelines and your WordPress files should be kept safe from intruders.

Common Pitfalls

A common mistake people make is to set the uploads folder to 777. Some do this because they get an error when trying to upload an image to their website, and 777 quickly fixes this problem. But never give unlimited access to everyone, or else you’ll make the Web server vulnerable to attack. If you follow the guidelines covered in this article, then you should have no problems uploading files to your website.

At times, though, a plugin will request that you set a file to 777. On these occasions, you can temporarily set it to 777, but make sure to set it back to its original permission mode when you’re done.

RESETTING YOUR WORDPRESS PASSWORD

In WordPress, there is more than one way to set your WordPress Password. In normal circumstances, you can do it through the WordPress interface. If you forget your WordPress Password, WordPress has a built-in recovery mechanism that uses email. But on some hosts, especially when email isn’t working right, sometimes you have to take different steps to reset your WordPress Password. Here’s a list of different ways to reset a password. Any one of them will work, and you only need one to succeed. Which method you will use depends on what type of access you still have on your website.

WordPress Password

To Change Your Password

To change your WordPress Password in current versions:

  1. In the Administration Screen, menu, go to Users > All Users.
  2. Click on your username in the list to edit
  3. In the Edit User screen, scroll down to the New Password section and click Generate Password button.
  4. If you want to change the automatically generated password, overwrite it in a new password in the box provided. The strength box will show how good (strong) your password is.
  5. Click the Update User button.
Your new WordPress Password takes effect immediately.

Through the automatic emailer

If you know your username or the email account in your profile, you can use the “lost password” feature of WordPress.

  • Go to your WordPress Login page (something like http://yoursite.com/wordpress/wp-login.php)
  • Click on the Lost your password? link
  • You will be taken to a page to put in some details. Enter your username or the email address on file for that account.
  • Wait happily as your new password is emailed to you.
  • Once you get your new password, login and change it to something you can remember on your profile page.

Through MySQL/MariaDB Command Line

  1. Get an MD5 hash of your password.
    • Visit md5 Hash Generator, or…
    • Create a key with Python. or…
    • On Unix/Linux:
      1. Create file wp.txt with the new password in it (and *nothing* else)
      2. tr -d '\r\n' < wp.txt | md5sum | tr -d ' -'
      3. rm wp.txt
    • On Mac OS X:
      1. Create file wp.txt with the new password in it (and *nothing* else), then enter either of the lines below
      2. md5 -q ./wp.txt; rm ./wp.txt (If you want the MD5 hash printed out)
      3. md5 -q ./wp.txt | pbcopy; rm ./wp.txt (If you want the MD5 hash copied to the clipboard)
      4. Note that nano and vi add a line break which changes the MD5 hash. This works as well:
      5. echo -n [yourpassword] | md5
  2. mysql -u root -p” (log in to MySQL/MariaDB)
  3. enter your mysql password
  4. use (name-of-database)” (select WordPress database)
  5. show tables;” (you’re looking for a table name with “users” at the end)
  6. SELECT ID, user_login, user_pass FROM (name-of-table-you-found);” (this gives you an idea of what’s going on inside)
  7. UPDATE (name-of-table-you-found) SET user_pass="(MD5-string-you-made)" WHERE ID = (id#-of-account-you-are-reseting-password-for);” (actually changes the password)
  8. SELECT ID, user_login, user_pass FROM (name-of-table-you-found);” (confirm that it was changed)
  9. (type Control-D, to exit mysql client)

Note if you have a recent version of MySQL (version 5.x?) or any version of MariaDB, you can have MySQL/MariaDB compute the MD5 hash for you.

  1. Skip step 1. above.
  2. Do the following for step 7. instead.
    • UPDATE (name-of-table-you-found) SET user_pass = MD5('(new-password)') WHERE ID = (id#-of-account-you-are-reseting-password-for);” (actually changes the password)

Note that even if the passwords are salted, meaning they look like $P$BLDJMdyBwegaCLE0GeDiGtC/mqXLzB0, you can still replace the WordPress Password with an MD5 hash, and WordPress will let you log in.

Through phpMyAdmin

This article is for those who have phpMyAdmin access to their database. Note: use phpMyAdmin at your own risk. If you doubt your ability to use it, seek further advice. WordPress is not responsible for a loss of data.

WordPress Password

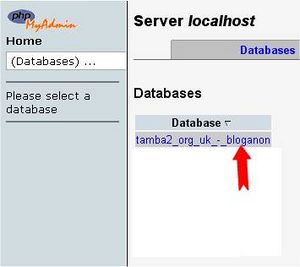
1. Begin by logging into phpMyAdmin and clicking databases.
2. A list of databases will appear. Click on your WordPress database.

WordPress Password

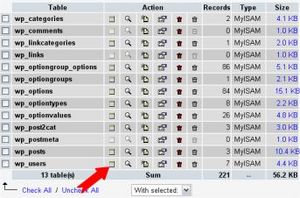
3. All the tables in your database will appear. If not, click Structure.
4. Look for wp_users in the Table column.
5. Click on the icon for browse.
6. Locate your Username under user_login
7. Click edit (may look like a pencil icon in some versions of phpMyAdmin)

WordPress Password

8. Your user_id will be shown, click on Edit
9. Next to the user_pass is a long list of numbers and letters.
10. Select and delete these and type in your new password.
11. Type in the password you want to use. Just type it in normally, but remember, it is case-sensitive.
12. In this example, the new password will be ‘rabbitseatcarrots’
13. Once you have done that, click the drop-down menu indicated, and select MD5 from the menu.

WordPress Password

14. Check that your WordPress Password is actually correct, and that MD5 is in the box.

15. Click the ‘Go’ button to the bottom right.
16. Test the new password on the login screen. If it doesn’t work, check that you’ve followed these instructions exactly.

Through FTP

There is also an easy way to reset your WordPress Password via FTP, if you’re using the admin user.

1. Login to your site via FTP and download your active theme’s functions.php file.

2. Edit the file and add this code to it, right at the beginning, after the first <?php:

wp_set_password( 'password', 1 );

Put in your own new WordPress Password for the main admin user. The “1” is the user ID number in the wp_users table.

3. Upload the modified file back to your site.

4. After you then are able to log in, make sure to go back and remove that code. It will reset your WordPress Password on every page load until you do.

Through WP CLI

WP CLI is a command line tool for managing your WordPress installation.

1. Move into the /wordpress directory and type

$ wp user list

to see all users. Find the ID of the user you’d like to update.

2. Then, update the user

$ wp user update 1 --user_pass=$UP3RstrongP4$w0rd

replacing “1” with the id of the user you want to update.

More on wp cli

Using the Emergency Password Reset Script

If the other solutions listed above won’t work, then try the Emergency Password Reset Script. It is not a Plugin. It is a PHP script.

Warnings
  1. Requires you know the administrator username.
  2. It updates the administrator WordPress Password and sends an email to the administrator’s email address.
  3. If you don’t receive the email, the password is still changed.
  4. You do not need to be logged in to use it. If you could login, you wouldn’t need the script.
  5. Place this in the root of your WordPress installation. Do not upload this to your WordPress Plugins directory.
  6. Delete the script when you are done for security reasons.
Directions for use
  1. Copy the emergency script from Emergency Password Script and put into a file called emergency.php in the root of your WordPress installation (the same directory that contains wp-config.php).
  2. In your browser, open http://example.com/emergency.php.
  3. As instructed, enter the administrator username (usually admin) and the new WordPress Password, then click Update Options. A message is displayed noting the changed password. An email is sent to the blog administrator with the changed password information.
  4. Delete emergency.php from your server when you are done. Do not leave it on your server as someone else could use it to change your password.

The Most Important Things You Need to Do After Installing WordPress

Installing WordPress! We are often asked by users about what to do right after starting a blog? Once you have installed WordPress, there are still quite a few things you need to do to properly set up and launch your website. In this article, we will share the most important things that you will immediately want to do after Installing WordPress.

Installing WordPress

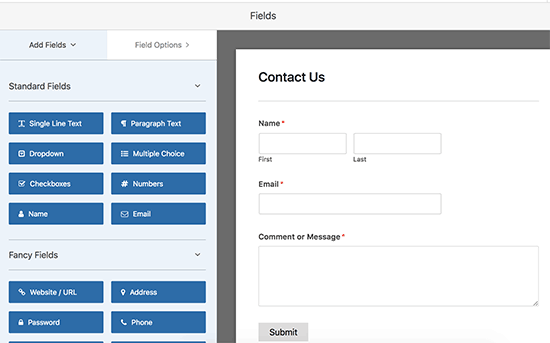
1. Add a Contact Form

All Installing WordPress websites on the internet need a contact form. It allows your website visitors to quickly contact you by simply filling out a form on your website.

Installing WordPress by default, WordPress does not come with a built-in contact form.

This is where WPForms comes in. It is the best WordPress contact form plugin and allows you to easily create beautiful contact forms for your website.

They also have a WPForms free version that you can download from WordPress.org plugin repository.

Installing WordPress

See our step by step guide on how to create a contact form in WordPress.

2. Change Site Title, Tagline, and Timezone

Next, you need to change the site title, tagline, and timezone settings after Installing WordPress. Simply head over to Settings » General page and change these settings.

Installing WordPress

3. Setup WordPress SEO

SEO, short for Search Engine Optimization, is used by website owners to get more traffic from Google and other search engines. it’s the most important thing after Installing WordPress.

After Installing WordPress you have to know that it is pretty SEO friendly out of the box. However, there is a lot more than you can do to optimize your SEO and get more traffic to your website.

The best time to set up your website’s SEO is right after Installing WordPress.

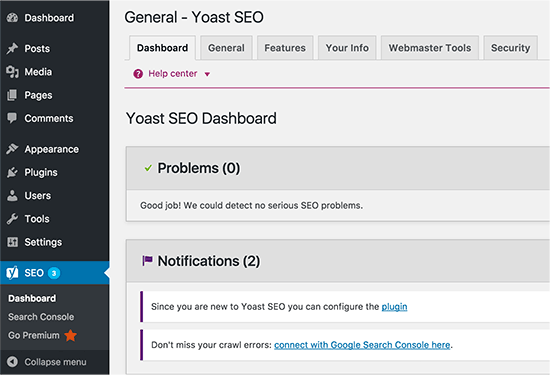
After  Installing WordPress We recommend using the Yoast SEO plugin. It is the most comprehensive WordPress SEO plugin on the market, and it takes care of all the important SEO settings out of the box.

Installing WordPress

For complete step by step instructions, see our ultimate WordPress SEO guide for beginners.

4. Install Google Analytics

After  Installing WordPress and done all that what we told you above you might know as a website owner, you need to understand your audience, what they are looking for, and how you can help them find it. These insights help you make smarter decisions to grow your business.

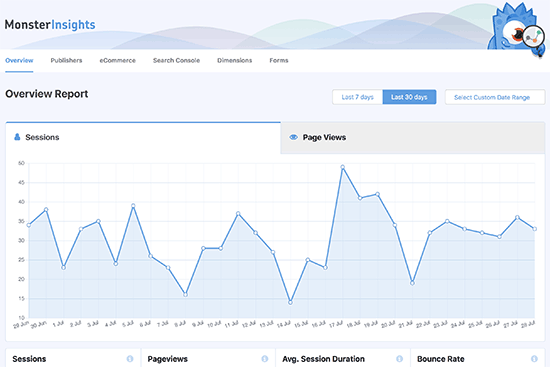
This is where you need Google Analytics. It shows you how many people visit your website, where they came from, and what they did on your website.

Installing WordPress is easy but some other things are quite typical. The easiest way to install Google Analytics is by using MonsterInsights. It is the best Google Analytics plugin for WordPress and shows beautiful analytics reports right inside WordPress.

Installing WordPress

For the complete setup, see our beginner’s guide on how to easily install Google Analytics in WordPress.

5. Install Caching

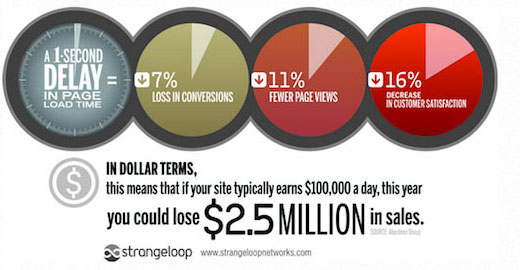
Studies show that 1 second delay in page load time can lead to 7% loss in conversions, 11% fewer page views, and 16% decrease in customer satisfaction.

Installing WordPress

As a website owner, you need to make sure that your website is fast and performs well even under high traffic. it’s the most important thing after  Installing WordPress

This is where caching comes in. It allows your website to quickly serve cached copies of your pages to users instead of generating them on the fly. This reduces server load on your website and improves your page load speed.

There are a lot of caching plugins available for WordPress, but we recommend using the WP Super Cache plugin. See our guide on how to install and setup WP Super Cache plugin for detailed instructions.

Caching alone can significantly improve your website’s speed. However, there are lots of other things you can do to make it faster. See our complete guide on how to improve WordPress speed & performance.

6. Setup Backups

Each year millions of dollars worth of damages are caused by data loss. Creating backups is the only way to make sure that you can easily recover your website in case of a disaster.

Some WordPress hosting companies offer limited backup services with their hosting plans. However, these backups are not guaranteed, and it is your responsibility to back up your website on your own.

Luckily, there are several great WordPress backup plugins that you can use to automatically create backups.

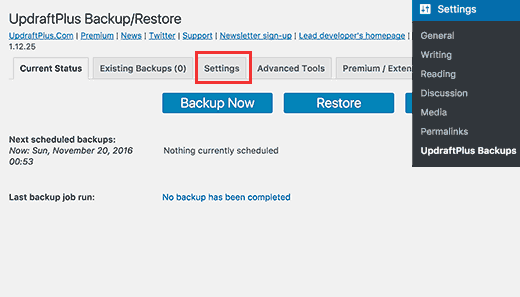
We recommend using Updraft Plus. It is the best WordPress backup plugin and allows you to set up automatic backup schedules. You can also store your backups securely on remote storage services like Google Drive, Amazone S3, Dropbox, and more.

Installing WordPress

For step by step instructions see our step by step tutorial on how to backup and restore WordPress using UpdraftPlus

7. Setup WordPress Security

WordPress is quite secure out of the box. However, you still need to follow security best practices to keep your website secure.

Some of these best practices are quite easy to do on your own like using strong passwords, securing WordPress admin area, and installing updates.

For other things, you will need a plugin. There are some great WordPress security plugins that you can use.

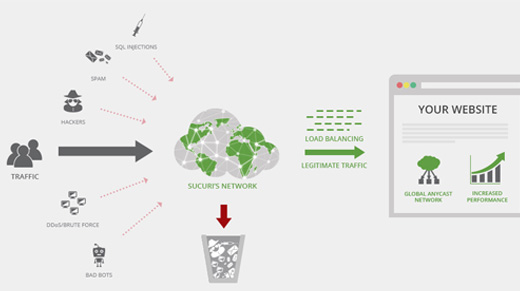
We recommend using Sucuri. They are the industry leader in website security, vulnerability scanning, and malware protection.

The best part about using Sucuri, is that they offer the best WordPress firewall plugin. A website firewall blocks suspicious traffic from ever reaching your website.

Installing WordPress

For complete instructions, follow the steps in our ultimate WordPress security guide for beginners.

8. Setup Spam Protection

Spam comments can be quite problematic. Most of them contain links to malicious websites known for distributing malware. Spam comments can affect your search rankings and your website’s reputation.

You can enable comment moderation in WordPress to prevent any comment appearing without approval. However, as the quantity of spam grows you will be spending considerable time moderating comments.

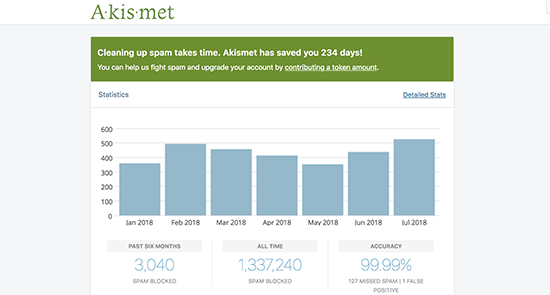
To fix this, you need to install and activate the Akismet plugin. It is a WordPress anti-spam plugin and one of the only two plugins that come pre-installed on every WordPress website.

Installing WordPress

To learn more, see our guide on how to set up Akismet anti-spam plugin in WordPress.

9. Delete Unused WordPress Themes

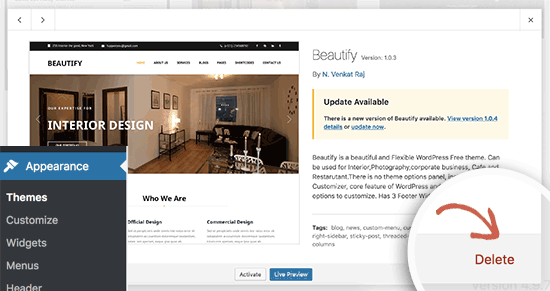
Most WordPress users will install and test a few themes before deciding on one that’s a keeper. Instead of leaving those unused themes installed, be sure to delete them. The reason for that is because even inactive themes will need updates.

We do recommend keeping at least one default theme installed. This theme will act as a fallback in case you have to switch themes when troubleshooting errors.

Go to Appearance » Themes page and click on an unused theme that you want to delete. This will bring up a popup showing theme details. In the bottom-right corner of the popup, you will see the link to delete the theme.

Installing WordPress

Repeat the process to delete all unused themes.

10. Setup WordPress Comments

Comments play an important role in most blogs. They are a good indicator of user engagement and allow you to build a community around your blog.

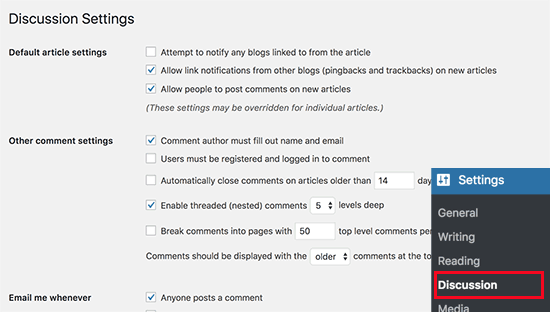
Simply go to Settings » Discussion page to setup comments. From here you can enable or disable comments, setup comment notifications, and comment moderation.

Installing WordPress

New WordPress Feature Plugin Adds Support for Progressive Web Apps

WordPress contributors are working on getting support for Progressive Web Apps (PWA) into the core. A new PWA WordPress Feature plugin is now available on WordPress.org, spearheaded by the teams at XWP, Google, and Automattic. Progressive Web Apps are applications that run on the web but provide a speedy app-like experience inside a mobile browser.

WordPress Feature

Google describes them as having the following three qualities:

  • Reliable – Load instantly and never show the down sour, even in uncertain network conditions
  • Fast – Respond quickly to user interactions with silky smooth animations and no janky scrolling
  • Engaging – Feel like a natural app on the device, with an immersive user experience

The plugin adds support for technologies that PWAs require, including Service Workers, a Web App Manifest, and HTTPS. These technologies support functions like background syncing, offline content, push notifications, mobile home screen icon, and other PWA WordPress Features.

XWP CTO Weston Ruter said the purpose of the WordPress Feature plugin is to curate PWA capabilities for proposed merging into the core. The idea is to merge them piece by piece. Core tickets are already in process for adding support for web app manifests and support for service workers, as well as bringing improvements to HTTPS.

“This PWA WordPress Feature plugin is intended to equip and facilitate other plugins which implement PWA WordPress Features,” Ruter said. “It’s not intended to negate any existing plugins with these WordPress Features, but rather to allow such plugins (and themes) to work together seamlessly and expand upon them.”

The first release of the plugin on WordPress.org (v0.1.0) adds support for web app manifests and initial support for allowing theme and plugin developers to register scripts for service workers via.wp_register_service_worker() It also includes an API for detecting whether HTTPS is available.

“The next step for service workers in the PWA WordPress Feature plugin is to integrate Workbox to provide a declarative WordPress PHP abstraction for managing the caching strategies for routes, with support for detecting conflicts,” Ruter said. Anyone who is interested to contribute to PWA support for WordPress can check out the discussions and plugin on GitHub.

In the past, app-like experiences were only available for sites and services that had their own native mobile apps, but native apps can be costly to develop and maintain. Progressive web apps use the greater web as their platform and are quick to spin up. They make content easier to access on mobile even without an internet connection. It’s also far easier to tap a home screen icon than to enter a URL on mobile, and this makes users more likely to engage with their favorite sites.

PWA Stats is a site that features case studies of progressive web apps that have significantly increased performance, engagement, and conversion. A few compelling examples include:

  • Tinder cut load times from 11.91 seconds to 4.69 seconds with their new PWA. The PWA is 90% smaller than Tinder’s native Android app. User engagement is up across the board on the PWA.
  • Grand Velas Riviera Maya resort increased its Black Friday conversion rate by 53% due to its progressive web app’s speed and notifications.
  • Trivago saw an increase of 150% for people who add its PWA to the home screen. Increased engagement led to a 97% increase in click outs to hotel offers. Users who go offline while browsing can continue to access the site and 67% continue to browse the site when they come back online.
  • Pinterest rebuilt their mobile site as a PWA and core engagements increased by 60%. They also saw a 44% increase in user-generated ad revenue and time spent on the site has increased by 40%.

PWA support in WordPress will enable the plugin and theme ecosystems to work together in providing site owners with more engaging ways to connect with their visitors. Once the market starts building on core support, site owners should soon be able to offer better experiences for mobile users without having to become experts in the technologies that power progressive web apps.

How To Write Better WordPress Blog Headlines

Writing high-quality WordPress Blog takes a ton of time, but sadly many high-quality articles won’t even get read. According to Copyblogger, 8 out of 10 people will read headlines but only 2 out of 10 will actually click on it and read the rest. To maximize your effectiveness with WordPress Blog blogging or content marketing, you really have to write amazing headlines that people feel compelled to click.

WordPress Blog

Learning copywriting is one of the best ways to get good at headline writing. Copywriters train themselves to write content so good that it convinces people to actually spend money and purchase products.

Want to become a headline writing ninja?

In this article, I’ll also show you examples of different copywriting techniques that you can use to write headlines to make them more enticing.

1. Write multiple headlines for every article

I usually try to write at least 5 headlines for every article and then pick the best one. A lot of professional bloggers and editors recommend doing this and it has definitely helped me write better headlines. There’s no formula for writing the perfect headline every time, so we need to write multiple headlines to brainstorm ideas.

2. Incorporate specific numbers into the headline

Headlines work best when they are very specific and one simple way to be specific is to add numbers to your headline. In fact, a study by Conductor found that people prefer headlines that contain numbers over other types of headlines by a significant margin.

WordPress Blog

For example, which of the following headlines is more compelling?

  1. How to Grow Your Email List
  2. 5 Tactics I Used to Grow My Email List by 142% in 3 Months

Most people would find the second headline more appealing because the first headline seems very generic while the second one contains specific numbers which imply that the writer is credible on the subject.

Another tip for using numbers is to try and use odd numbers instead of even numbers. A study conducted by Outbrain and Hubspot found that headlines with odd numbers get 20% more clicks than headlines with even numbers.

But what if your article contains an even number of items? Here are a few simple solutions….

  • Delete the weakest item from the list
  • Make the last item a bonus item. For example, if you have a list of 7 Writing Tips, you can just present the 8th tip as a “bonus tip” instead of assigning it a number.
  • Just use an odd number in the title anyways. For example, if I have a list of 22 tips, I might instead write it as “21+ Marketing Tips for Your Business”. Writing the title this way also gives me the option of expanding the post later to include more items.

3. Use parentheses or brackets

One way to create more engaging titles is to use parentheses in your headline. Some of the world’s most respected copywriters use parentheses in their headlines as well as within their copy.

Additionally, Outbrain and Hubspot conducted a study of over 3.3 million paid links and found that headlines with brackets performed 38% better than headlines without them.

Writers can use brackets or parentheses to separate clauses in a headline and in the examples below, notice how parentheses also create a little visual variety. You can use parentheses to make headlines more appealing in several ways.

Referencing additional bonuses:

One way to use parentheses is to mention an added bonus or give readers another reason to click.

Example: 7 Ways to Write Click-Worthy Headlines (Free Headline Template Inside)

Generating curiosity:

Another use of parentheses is to add a short phrase that will generate curiosity. Sites like Buzzfeed and Upworthy used this tactic a lot when they were starting out.

Example: 7 Ways to Write Click-Worthy Headlines (#3 Doubled My Sales)

Boosting credibility:

One great way to use parentheses is to add a credibility booster to your headline. Give readers a reason to view you as an authority right away and they’ll be much more likely to click through and read your article.

Example: 7 Ways to Write Click-Worthy Headlines (That Increased My Sales by $12,000)

You can think of parentheses as embedding a really short sub-headline into your article title. Adding just a few words in parentheses can strengthen your headline by adding credibility statements, promising added benefits or giving readers another reason to click.

4. Hyphens and Colons also increase click-through rates

The Outbrain study also found that using hyphens and colons can increase click-through rates by 9% on average. Similar to parentheses and brackets, hyphens and colons also add visual variety and encourage you to write more interesting headlines.

A simple formula for using hyphens and colons is to use your SEO keywords phrase at the beginning and then add a compelling title after it.

Here’s an example:

Social Media Marketing: 7 Proven Ways to Get More Social Shares for Your Content

Of course, you don’t have to use this formula. Feel free to get creative if you can think of a good headline.

Here’s another example from Mailchimp’s WordPress Blog regarding headline length where they did a study of 12 billion email headlines and found that headline length made no difference in click-through rate:

This Just In: Subject Line Length Means Absolutely Nothing

5. Split test headlines when emailing your list

Another thing you can do to improve your headline writing skills is to split test headlines when emailing your list about a new WordPress Blog post. Most email programs like MailChimp will allow you to test different headlines when you send out emails by sending each variation to a subset of your email list and then emailing the rest of your list with the winning headline.

You may be surprised to find which headlines work best. Sometimes shorter and simpler headlines can outperform longer and more detailed headlines.

In any case, split testing headlines help you better understand your audience and allows you to write better headlines in the future.

Tip

If you use WordPress, there are plugins that enable you to test headlines right on your WordPress Blog.

Check out WP Superstars’ post on split testing plugins for WordPress to learn more.

6. Consider using questions

Another tactic that can bet people to click on your headline is to ask a question. Questions can create curiosity and people who want to know the answer to the question will click your headline and read the article.

Make sure it’s not a question that they can easily answer, but one that will provoke thought and generate curiosity.

Example: Are You Making Any of These 7 Common Blogging Mistakes?

If you are a blogger, you may be curious to at least see what the 7 blogging mistakes are. Questions are a great way to construct headlines that get clicked.

7. Look for SEO keywords so that searchers can find your content

Many bloggers know that they should do keyword research to find keywords that people are actually searching for, but many bloggers skip this step. However, keywords are important if you want to get long-term SEO traffic to your WordPress Blog.

One WordPress Blog post that I wrote that got continuous exposure was my expert roundup guide on Smart Blogger that is currently ranking for the phrase “expert roundup”. It’s been ranking for that phrase for several years, so even though I wrote it years ago, I still get exposure from that guide.

WordPress Blog

Additionally, that article continued to get natural links because new people found it through the search engines and it is perhaps the most detailed guide on the topic.

Creating headlines that are SEO optimized can help people discover your content, so it’s worth taking the time to do it if you are investing time and resources into content creation.

8. Search for other articles on your topic in Google (to see other competing headlines)

Another good exercise when writing headlines is to search Google for other articles on the topic and see what other headlines you are competing against. Looking at other people’s headlines might give you some good ideas for your own headlines.

Think about how you can create a headline that is better than competing articles or how you can create something that offers something different.

9. Reuse past winning headline formulas

If you’ve done a good amount of blogging in the past, then consider reusing headlines formulas that worked well for you in the past.

Looper is an entertainment site that features articles and news about movies and celebrities. I discovered them on YouTube because their videos kept popping up in my feed.

Here are a few of them…

  • Why Hollywood Won’t Cast Tobey Maguire Anymore (7 million views)
  • Why Hollywood Won’t Cast Alyson Hannigan Anymore (2.5 million views)
  • Why Hollywood Won’t Cast Tom Welling Anymore (2.5 million views)

Do you see a pattern?

If you’ve written a headline in the past that did really well, consider using the same formula for writing headlines for future articles.

10. Create a “Curiosity Gap”

Another way to get people to click your headline and read your article is to create what is called a “curiosity gap”, a concept popularized by Upworthy. The basic idea behind this approach is to evoke curiosity by writing a headline that gives information about what the article is about but leaves the reader wanting more or hints at something interesting in the article.

Here’s an example of an article that I found on Upworthy that utilizes curiosity gaps to convince readers to click on it and read more:

I wanted to know how Mister Rogers felt about gay people. Here’s what I found.

Curiosity gaps can be incredibility powerful if your goal is to increase clicks. In fact, Copyhackers was able to increase clicks to their pricing page by 927% by using curiosity gaps in their headlines.

You can also use curiosity gaps in your sub-headings within your article so that when people scan your article, they will be intrigued enough to read the whole thing.

Note that curiosity gap headlines aren’t usually ideal for SEO titles (which should focus more on clarity), but can be great for social media. Another important thing to remember to do is make sure that your headline is not too vague and still lets the reader know what the article is about.

11. Test negative headlines

Outbrain conducted a study of 65,000 ad headlines and they found that headlines containing negative words like “never” or “stop” performed 30% better than headlines without them.

They also discovered that headlines with positive superlatives like “best” performed 29% worse than headlines without them. The reason that headlines with positive words performed worse is likely because such headlines are overused.

So once you’ve come up with a good headline, consider writing a version from a negative perspective.

For example, instead of “5 Amazing Ways to Lose Weight”, you might use a headline like “5 Things You Must Avoid to Prevent Weight Gain”.

12. Write different headlines for different channels

Your WordPress Blog title doesn’t have to be the same as your SEO title or the headline that you share on social media. If you are writing articles on a high traffic WordPress Blog, then you may want to consider writing different headlines to target different channels.

Slate.com uses this approach to create headlines targeted towards different channels.

Article Title: Why Do We Keep Planting Stinky Gingkos?

SEO Title: Why we still plant smelly ginkgo trees.

Social Media Title: Ginkgo Trees Smell Like Vomit. Why Do We Plant Them All Over Our Cities?

The social media title is more edgy and likely results in more discussion and shares on social media. The article title is short and straightforward but doesn’t contain keywords like the SEO title.

13. Practice writing different sub-headlines (including the concluding paragraph)

Another tip for improving your headline writing skills is to practice writing different sub-headers within your article. Some bloggers will spend some time on the article headline, but don’t put much thought into the sub-headings throughout the article.

Try to rewrite sub-headers so that each one is a compelling headline that makes readers want to read each section.

You can also try creating a unique sub-header for the concluding section. Most people simply use “Conclusion” or “To Sum It Up”, but with a little thought, you can come up with a better sub-head for your final section.

Asides from making your article more engaging, rewriting sub-headers is a great way to practice your headline writing skills.

WordPress Accessibility: Making Your WordPress Website Usable By Everyone

Making Your WordPress Website Usable By Everyone. The internet is deeply integrated into the way our world works, employed in nearly all sectors: from education and politics to business and healthcare.

WordPress website

When browsing online, it’s likely that the first thing you’ll notice about a website is its design, quickly followed by graphics and content elements. What you probably don’t think about is WordPress accessibility.

When it comes to your business website, accessibility must become a higher priority.

So, What Is WordPress Accessibility?

WordPress accessibility refers to the practice of making your WordPress website and its contents accessible to all users, including those with disabilities—specifically those with visual impairments.

Many WordPress websites often sacrifices WordPress accessibility for a beautiful design. Though the design is absolutely important, you don’t want to compromise too much function.

As a brand, you want to provide a positive user experience to all users, including those with disabilities. Also, it’s important to remember that accessibility issues are not limited to only those with disabilities.

Web Accessibility Initiative points out that certain changes to your website’s design can benefit many different groups of people:

  • People using devices with small screens, different input modes, etc.
  • The elderly
  • People with “temporary disabilities,” including a broken limb or lost glasses
  • Users with “situational limitations,” such as those accessing a website in a bright location or in an environment where they cannot listen to audio
  • People who have a slow internet connection

Why You Should Care About WordPress Accessibility

As lawmakers look to amend and evolve the Americans with Disabilities Act (ADA), it is important to get ahead of the curve to protect yourself and your company.

The ADA was passed in 1990 to protect the civil rights of those with disabilities from discrimination. It covers a wide range of topics, including transportation, telecommunication, employment, and even building codes, such as requiring modern buildings to have ramps for wheelchairs (or similar features).

Because the law was passed before the digital revolution really caught fire, lawmakers are seeking to amend the language used. They are specifically looking at the term “access barriers”, which was originally intended to mean physical barriers. The idea is to expand that meaning to now include information barriers, such as those that can exist online.

Recently, there has been a slew of cases against companies with websites that were deemed inaccessible.

Disney, Netflix, and Target have been served such lawsuits; Target was required to pay $6 million in damages. As of 2017, there have been 751 ADA and web accessibility cases filed since the Seyfarth Shaw law firm started tracking such cases in 2015. 423 of those cases came from the first eight months of 2017 alone. Most of the defendants have been retail companies.

Before you think you’re small enough to slip under the radar for those slinging lawsuits around over issues of WordPress accessibility, there are still many other reasons you’ll want to make changes to your WordPress website.

A survey by the Pew Research Center shows that people with disabilities are three times less likely to go online than their counterparts without disabilities. This poor showing online can likely be linked to the fact that 71% of people with disabilities leave a website if it isn’t accessible, which is a shame because people with disabilities represent $7 trillion in disposable income annually. That’s a huge market being turned away due to design issues.

Additionally, there are SEO benefits for being accessibility compliant. Google and other search engine providers reward accessibility-compliant websites in an effort to encourage more websites to increase their accessibility.

Making Your WordPress Website More Accessible

There is a wide range of accessibility ideas provide in Web Content Accessibility Guidelines 2.0(WCAG). Using accessible WordPress themes can simplify the process.

However, if you’re only wanting to make limited changes to your current WordPress website, you can look at using the WordPress accessibility plugin, as well as changing colors, contrast, image ALT text, content headers, text alternatives, and more.

Install the WordPress Accessibility Plugin:

The easiest first step you can take is installing and activating the WP Accessibility plugin. While most accessibility issues cannot be addressed without directly changing your theme, the plugin offers many useful features for getting on the right track with WordPress accessibility.

Among its features is the ability to enable skip links, which are internal page links that allow users to skip directly to the content. This is particularly helpful for people using screen readers. It also lets you add a toolbar that allows users with vision impairments to change the font size, contrast, and grayscale of your WordPress website.

Additionally, it removes title attributes from images inserted in content, which most screen readers fail to identify, often reading the anchor text instead.

Color Contrast:

There are more than 2.7 million color blind people in the world. These people have one of three types of color blindness: total color blindness, two-color vision, and deficient color vision. To be sure that your website design works with or without color, be conscious of color ratios and contrast.

Use high-contrast color options, such as black and white, to make your site more readable. The WCAG 2.0 recommends a contrast ratio of 4.5:1 for body text. If your website still needs a little more flair, you can lean on the use of patterns or textures to further increase contrast.

Image ALT Text:

Image ALT text describes the appearance and function of an image on a page.

It was originally designed to increase accessibility, as screen readers are unable to interpret a picture without ALT text. However, it has since been used as part of SEO strategies with targeted keywords to be identified and recognized by search engine crawlers.

If you’re in the habit of using ALT text as a way to stuff keywords into your site, you’ll want to stop, or at least amend your process, as it can ruin the experience for people using screen readers. Thankfully, clearly describing the image (assuming it’s relevant to what you do) should still end up containing useful keywords. In general, no ALT text is better than irrelevant ALT text.

Content Headers:

A lot more people will skim your content than read it word for word. Content headers will not only let users skip to the parts they are most interested in, but the headers can also break large text blocks into more readable sections, helping screen readers determine the context of each section.

Text Alternatives:

If you have a multimedia website that includes videos, as well as audio files, such as podcasts and audiobooks, it’s best to include subtitles or transcripts. This can help those who are deaf, as well as those who are in a public place and are unable to play the media files out loud, to enjoy the experience.

Explicit Form Fields:

When creating forms for your website, it may be tempting to place the field labels inside the field for aesthetic purposes. However, some screen readers cannot access the text when it is inside the field. So, keep things simple and put the form labels outside form fields.

Keyboard Accessible Links and Menus:

There are some people that cannot access websites using a mouse because of motor skill disabilities. They rely on their keyboard to navigate sites, using the tab key to move forward and shift+tab to go back.

The issue that most commonly arises for these users is that the top items on a drop-down menu are accessible but submenus are not. You can remedy this by assigning shortcuts or access key capabilities. For example, pressing “1” will take you to the homepage, “2” to the about page, and so on.

Test for WordPress Accessibility:

If you’re unsure of the quality of your WordPress accessibility, you can test it.

Though the Web Accessibility Initiative does not endorse any specific tool, you can find a list of accessibility tools on their website. Give a couple of them a try and see how your site stacks up. The Google Chrome extension, Web Accessibility Evaluation Tool (WAVE) is another way to assess your website’s accessibility.

Examples of Websites Doing Accessibility Well

There are plenty of websites that have been designed with care and an awareness of accessibility. The website for the Pyeongchang 2018 Winter Olympics is an example of such a website with only two errors and 264 correctly labeled elements. Apple does a hair better, garnering only a single WAVE error.

Final Thoughts: WordPress Accessibility: Making Your Website Usable by Everyone

The internet is deeply ingrained in nearly every part of our lives, from shopping and socializing, to setting up appointments with healthcare professionals and workers. Unhampered by disabilities, it is easy for the vast majority of users to take for granted the ease with which they are able to navigate the internet.

However, not only to get ahead of possible changes in the law but also to simply ensure a better user experience for all of your potential visitors, it’s important to design or modify your website with accessibility in mind. In addition to opening your doors to these people, you also will reap the rewards of better SEO by following the accessibility guidelines provided by Web Content Accessibility.

WordPress Security: Nulled Scripts and the CryptoPHP Infection

Our friends over at Fox-IT based in Delft in the Netherlands just contacted me with some amazing research they’ve just published. If you’re technically minded and want as much detail as possible, For WordPress Security I recommend you skip this blog entry and head straight over to the Whitepaper that Fox-IT has published on the CryptoPHP backdoor (It’s 50 pages). I’ve summarized the details and our response:

WordPress Security

Nulled scripts are commercial web applications that you can obtain from pirate websites that have been modified to work without a license key. They are the web equivalent of pirated software. They include commercial WordPress themes and plugins.

It’s come to our attention courtesy of Fox-IT that nulled scripts are being distributed via several websites with a sophisticated infection pre-installed. Fox-IT has dubbed it CryptoPHP because of the fact that it encrypts data before it sends it to command and control servers.

The infection is relatively simple: Inside a nulled script there’s a little line of code that looks like this:

<?php include('assets/images/social.png'); ?>

If you’re a PHP developer you will immediately recognize this as looking strange: It is a PHP directive to include an external file containing PHP source code, but the file is actually an image. Inside this image file is actual PHP and the code is obfuscated (hidden through scrambling) to try and hide the fact that it’s malicious.

If you’re a Wordfence customer, and you are doing scans, the default settings for Wordfence do not scan image files for infections. However, we are aware of these kinds of infections so a while back we added an option to scan image files as if they are PHP code. However, with the detection we just added, Wordfence will detect the ‘include’ directive above in your PHP source, so even if you haven’t enabled image-file scanning, you will still catch all known variants of this infection provided you are running the newest version of Wordfence.

Fox-IT has determined that the purpose of the malware is, currently, to engage in black-hat SEO by injecting links to other, presumably malicious, websites into your content. However, this infection is sophisticated and it communicates with command and control servers that can instruct it to do a variety of tasks including the ability to upgrade itself. So this is a classic botnet infection which turns all infected websites into drones that can be instructed to do just about anything, from sending spam email to SEO spam to hosting illegal content to performing attacks on other websites.

The researchers think they may have identified the location of the author. Inside the code of the malware is a user-agent (browser) check that checks to see if the web browser user-agent equals ‘chishijen12’. If it does, then the application is instructed to output all PHP errors to the browser, presumably for debugging purposes. Fox-IT found an IP address that is associated with that user-agent and the IP is based in the state of Chisinau in Moldova. The name of the state is similar to the user-agent string, which gives their theory some WordPress Security credence.

This infection doesn’t just affect WordPress but affects Drupal and Joomla too. The detection we’ve added will actually detect the infection in Drupal or Joomla source code too if that lives under your WordPress directory.

If you’re an enterprise customer and are using an IDS like Snort or the EmergingThreats ruleset, Fox-IT has created Snort signatures which are in the WordPress Security whitepaper and I see that EmergingThreats have updated their open ruleset today to detect this.

You can find the full white paper discussing this new threat here in WordPress Security and it includes quite a bit of technical detail if you’re a developer or information security researcher.

Please help spread the word about the danger involved in downloading or distributing nulled scripts and help keep the community safe.